Apr 18, 2014

DIY Dummy Put To Some Good Use: Alpaca Lace Hearts Shawl And Knitting Pattern

Today is the day when I unveil my finished DIY dummy bust shape.

After I finished stuffing and covering Barbie twice with papier mache, I painted it all over with white poster paint. I used 2 coats but she could really have used 3.

I was very lucky with the nice sunny weather here at the beginning of the week, so I did all this outside, where I managed to dry the 2 coats of paint in one afternoon, while worriedly watching and hoping the wind wouldn't blow her out on the uncut grass.

After I brought the dummy home, I noticed the paint was looking a bit cracked, so I covered it with a thick coat of craft glue in order to seal everything in place.

So now I have one bumpy dummy bust, which I dressed using one of my summer tops, to hide all the bumps and not too even white colour.
It's not perfect but it will do for what I need: something that is not me to help me display knitted scarves, wraps, shawls...
It was a lot of time-consuming work, and I resent it a little for all the time I spent making it, dirtying my kitchen, and not letting me knit as much as I would have liked. 

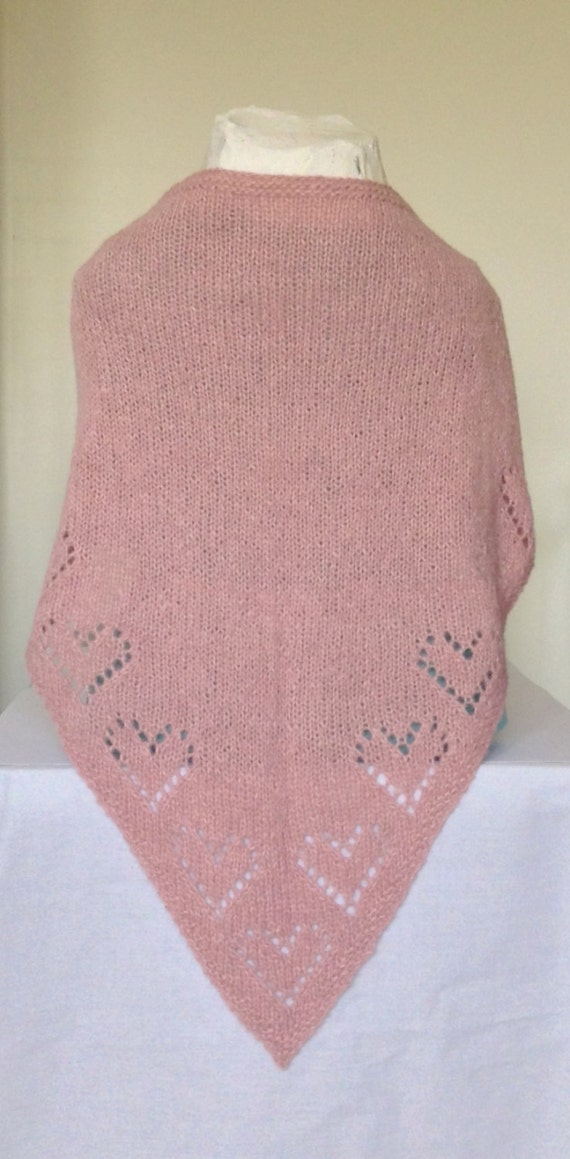
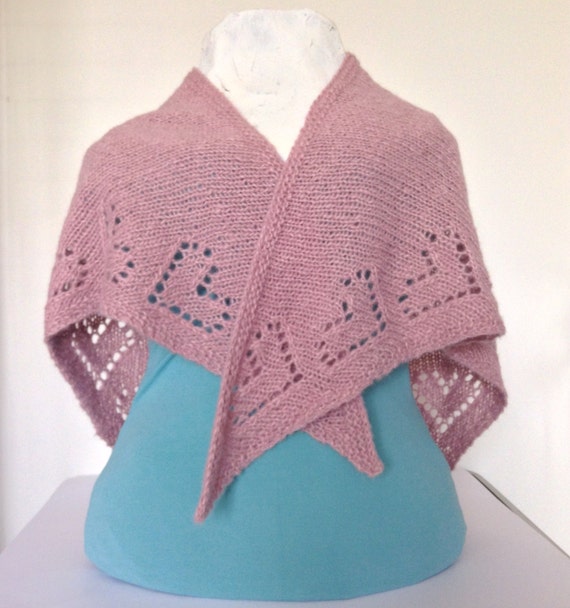
In the end, I am glad I have my display dummy now, and I have already put it to work to display my latest knit of art: the Alpaca Lace Hearts Shawl:

This shawl is available to buy now from my Etsy shop Sophie's Knit Stuff.


During all this week, I have also worked very hard on the shawl pattern, and I am proud to announce, that after even more time drawing charts on my computer, typing the corresponding instructions making sure there were no mistakes, translating the same instructions in French, and an awful lot of proofreading, the knitting pattern for my Alpaca Lace Hearts Shawl is now also available to buy from Etsy, Ravelry and Craftsy.


I am going to have a cup of coffee now, before I replenish my food supply and clean the house, and then hopefully I will be able to enjoy a nice long Easter week-end.

Happy Easter!

***Follow me on Twitter and Like Sophie's Knit Stuff on Facebook for more updates***

Apr 13, 2014

Making A DIY Bust Shape: How To Build A Dummy Body Using Chicken Wire

For a while I've wanted to get a dummy body to display the scarves I knit but unfortunately, living on the Island of Ireland leaves me with 2 choices: paying astronomic shipping rates to get a large item delivered to me, or making one myself.

There are a few YouTube videos that show you how to make a dress form: you can get someone to cover you with duct tape, get that someone to cut you out of the shape made, close it up with more tape and fill it with stuffing, newspapers, expanding foam...

Being the only adult in my house (I'm not sure I should trust a 12 year old to have the patience to do all that work: she might give it up, leaving me half stuck for a few hours, and the cutting bit might be a bit tricky - I don't want blood on my dummy!), I decided to use another DIY method to build my dummy body: of course it had to be the hardest and slowest one!

First I got a small roll of small gauge chicken wire in a local shop: you can get some in most hardware stores, you don't need a very large quantity, a 100cm length is enough for an average size bust.

Then I put on my gardening gloves and tried shaping my roll into something that looked like a female body shape:

You really need gardening gloves for this, as chicken wire has sharp bits and if you're a knitter or a crocheter, you need to protect your hands! You might want to cover your kitchen table with newspapers before you start, I left my cheap tablecloth on to protect the table from scratches and the tablecloth is still a bit grey.

Shaping is a bit tricky: you need to pull the holes in the wire slightly apart for wider areas (chest, shoulders and hips), and push them tighter for skinny areas (neck and waist).
I call her Barbie: she's not made out of barbed wire, but her waist is Barbie-like skinny. Hopefully I'll manage to fatten her up a bit, but as she'll only be used for scarves, she doesn't need to look too realistic (she has a bigger chest and tinier waist than me, but the height and shoulder to shoulder width are about right).


Now comes the messy bit: that wire is pretty sharp and not that pretty at the same time, so I decided to cover my dummy body with papier mache.

I started tearing up strips of newspaper in front of my kids hoping they would want to finish the pile and it worked!

Then I got my 12 year old to show me the papier mache mix she had used in school for her art classes: I thought it would be more complicated but it's only a pancake consistency mix of flour and water (messy, but easy enough to clean afterwards).

While my youngest was out playing with a friend (being a bit of a mess hater, I was a bit relieved that she was not around), I enrolled my 12 year old to help me cover the dummy shape with papier mache: it took us about 1 hour before the shape was all covered but it needed more layers so I let the first coat dry outside for the rest of the afternoon.

At that stage I had papier mache over the neck opening but not the bottom opening, which was a good thing because one of my very wise Facebook likers advised me to stuff it with newspapers to avoid it becoming "wonky".

The next morning I turned the bust over using my clean recyling bin: I used clean papers and cardboard found in the said recycling bin, as well as lots of old brochures and magazine pages to stuff the body, because I didn't want to run out of newspaper. Now is the time for me to confess to very rarely buying a newspaper, but I take all the local free newspapers I can get!

After stuffing it, I covered the bottom part of my dummy form with papier mache (still turned up neck down in my recycling bin).


Then after lunch, I added some white craft glue to the mix and added a layer to the front, while at the same time trying to fix some gaps and bumps, before letting it dry on the sunny patch in my kitchen.

I'll be doing the same with the back later on, and I will be painting it when I can rely on the weather to be dry and not as windy as it is today because I'm not cleaning paint stains off my kitchen floor. It needs to be sealed with some kind of paint or varnish (I will be using matte paint I had bought for another DIY project that did not happen and I don't want a shiny dummy when taking my scarf pictures), because I am afraid the smell of pancake batter would attract mice into my house in winter: it will need a thick coat of paint!

If you want to do this in your own kitchen, set aside 2 full days of no serious cooking because this will take over your kitchen as well as your time. I think using a hair dryer on a low setting would help it dry more quickly but I decided to let it air-dry, as I have plenty more things to do in between papier mache layers (I just hope my kids don't step in the papier mache mix bucket or on my dummy while I'm upstairs typing this!).

I'm not sure when I can post a picture of the finished dummy (or list the shawl I finished making, since I'll need this dummy to be finished and completely dry before then!), but when it is, I will let you all know!

***Follow me on Twitter and Like Sophie's Knit Stuff on Facebook for more updates***


Apr 7, 2014

Free Crochet Easter Egg Pattern For Beginners

Last Friday while at school for the weekly crochet session where I try helping out (I say try because sometimes there's more giggles than actual crocheting:-), the teacher was looking for ideas of something simple the kids could work on during the week.

Because it's nearly Easter the obvious and easiest thing I could think of was a crocheted Easter Egg so I said I would try and come up with an easy Easter Egg crochet pattern.

Some of the girls in the class are still struggling with their crochet (I guess I'm not that much help then!), so I could have designed an egg to work in the round, but I thought it might be easier to work 2 flat pieces and sew them both together after stuffing them with cotton wool or other stuffing material.

I did my homework and came up with this:

Crochet Easter Eggs

I made the turquoise egg on Friday, typed the pattern on Saturday and my daughter tested the pattern by making the red and pink eggs on Sunday morning: she found them so quick and easy she made one more last evening and cast on a 4th one this morning, to work on in her spare time in school.

I also made a crochet basket to put all our eggs in, but I finished it last night and my daughter took it to school this morning before I got the chance to take a picture:-(

Since I am sharing the pattern with the school, I thought I might also share it with my blog readers.

If you are a beginner the instructions are very easy to follow because I tried making sure it would be easy for 12 year-olds (the average class age), there is even a chart included to make it even easier: my daughter can vouch for it!

You can download the PDF for free from my Ravelry store. Here is the direct link: Easy Crochet Easter Egg for Beginners.

I apologise to my French countrymen and countrywomen as the pattern is in English only because I am not familiar with French crochet terms (I learned crochet recently and have been living in Ireland for about 20 years), but the chart should make it easy enough to understand as long as you know how to increase and decrease in double crochet.

***Follow me on Twitter and Like Sophie's Knit Stuff on Facebook for more updates***


Apr 3, 2014

Lace Alpaca Hoodie Cowl Knitting Pattern

For the last 2 weeks I have struggled writing the knitting pattern for the Lace Alpaca Hoodie Cowl I designed last November, and knitting a new one from scratch following my own instructions:

The main reason why I struggled so much was because I waited so bloody long between knitting it last November while scribbling some half French half English notes on a notepad, and realizing while knitting the Hoodie Cowl now that I must have skipped some steps, because I had to do some heavy editing to the pattern I thought I had got right (the shame!)

Lace Alpaca Hoodie Cowl
Anyway, now the knitting pattern is available to buy from my Ravelry Shop as well as Etsy, and it's in French as well as in English (purchasers will receive 2 PDF files: one in each language).

I try not to price knitting patterns too high, but after publishing my last one, I realised that after the Paypal and the Etsy fees, there isn't much left to go in my pocket, so hopefully I will sell a few of those despite the fact that spring is already here and that knitters may be looking for more summery knitting patterns for the next few months; well, the pattern is there to stay, and I will just have to remember to promote it again in the Autumn!

To buy my Lace Alpaca Hoodie Cowl from my Ravelry shop, please click here.

To buy it from my Etsy shop, please click here.

***Follow me on Twitter and Like Sophie's Knit Stuff on Facebook for more updates***

Mar 21, 2014

Crochet and Knit Hats For Heroes

A while ago I came across a Facebook Group called Hats for Heroes that was asking people to crochet hats for children in Ireland affected by cancer.

At the time I wasn't very experienced in crochet but I was and I still am learning, so I thought I would give it a go, since I would be doing something I enjoyed for a good cause.

I contacted the people at Hats for Heroes to ask if the hats could be knitted and the answer was yes, but I still wanted to try crocheting some, so I looked for a nice pattern online and I found this lovely Tweetheart Hat crochet pattern which gives intructions for all sizes from newborn to adults.

Of course, as usual, I used a different wool from the one in the pattern, but I wasn't doing a specific size so I could experiment with different yarns, as long as it was soft (scratchy isn't an option when you've lost your hair after chemotherapy).

Here is my first Tweetheart hat made with soft Aran (worsted) yarn following the size for child: it is smaller than I expected but will fit a baby (maybe 3 or 6 months old), I'm not sure of the exact age since I don't have babies lining up to try on the hats:

Baby Tweetheart Crochet Hat


Then I used similar weight yarn and followed the adult size and I got a hat suitable for a child: I thought it would look prettier without the ear-flaps and I added a frilly picot edge and flower:

Child Flower Crochet Hat with Frilly Picot Edge

Then I thought it was time to make something less girly so I went out and bought some chunky navy and blue yarn to make a teen sized beanie hat, following the instructions for child size because the yarn was pretty thick:

Teen Crochet Hat with Navy and Blue Stripes

Since I had leftover yarn, I decided to knit a hat this time, casting on as many as I thought I would need for a child's hat and using a pattern I already had, but modifying it slightly it as I went:

Child Knitted Pompom Beanie Hat

Guess what? This one will fit a toddler or small child, just as I intended! The pompom was added as a result of feedback on my Facebook page (I think I was going to add it anyway;-)

As soon as all 4 hats are finished drying (I like to wash them in gentle shampoo or wool friendly detergent before shipping any knit or crochet clothing item I make), they will be off in the post on their way to Hats for Heroes who will forward them to Irish Hospitals where they will be given to children with cancer. I hope these hats will cheer the children up!

As much as I've enjoyed knitting and crocheting hats and daffodils for charity, I must really get a move on and work a lot harder on knitting new items and publishing new knitting patterns for my Etsy shop, which is slowly depleting itself as my Christmas items are coming to the end of their 4 months listing (the maximum before I have to pay commission to get them re-listed) and I am not planning on re-listing those until next October.

So off I go and pick up my knitting needles (after I've had my lunch of course, I need to eat yummy food and drink coffee to keep my creative brain cells active!)


***Follow me on Twitter and Like Sophie's Knit Stuff on Facebook for more updates***

Mar 17, 2014

St Patrick's Day Crochet Scarf


My daughter's class is learning how to make crochet granny squares in school and I've been roped in to help once a week, so since we were so close to St Patrick's Day, I decided to make a granny square using the Irish colours: green, white and orange:

St Patrick's Day granny square

I wasn't sure what to do with it, so I made 5 more like this and 6 using the same colors, reversing them (orange in the middle and green at the outer edge) and then I joined my 12 granny squares to make an Irish St Patrick's Day scarf:

St Patrick's Day scarf

Since I have to stand outside in the cold watching my 2 daughters playing with their school band in our local St Patrick's Day parade, I might as well be warm doing it!

And in case I'm not brave enough to wear the St Patrick's Day scarf outside, I'll always have my crochet shamrock pin:

Crochet Shamrock pin
 

Happy St Patrick's Day!


***Follow me on Twitter and Like Sophie's Knit Stuff on Facebook for more updates***

Mar 13, 2014

Blue Cabled Cardigan Finished!

I am very happy to say that between the time I finished knitting all the pieces of my blue cabled cardigan and the time I sewed all the pieces together, no more than 2 or 3 weeks have passed, with an extra week to wash and dry it and deciding my cardigan needed some buttons.

The knitting pattern did not provide for buttons but mentioned that a shawl pin can be added if the cardigan was to be worn closed, so I knitted as per the instructions, without any buttonholes.

Last night I tried making a flower pin using a large safety pin to keep my cardigan closed but I wasn't happy with it, so this morning I added a crochet button band on one edge and 4 nice wooden buttons on the other side. The cardigan was then ready to be worn in public after roughly 2 months of starting it (please don't judge my awkward posture, I just don't know how to stand without looking weird):

Front

Back

 Now I must get on with my St Patrick's day scarf which I'm not sure I will dare wear in public: I might just hang it in the house as a decoration, but that's something I won't share here until Paddy's Day.


***Follow me on Twitter and Like Sophie's Knit Stuff on Facebook for more updates***